Please disable your adblock and script blockers to view this page

Search this blog

Showing posts with label af:table. Show all posts

Thursday 18 May 2017

Populate data in ADF Table using Web Service Data Control


My previous post was about creating a JAX-WS Web Service from Java Bean. Now In this post, I am going to elaborate about consuming that Web Service in ADF Application and show Employees data in ADF Table

So for this requirement, We need to use Web Service Data Control and from that WSDL we can create ADF Faces components

Let's see how to implement this

Monday 1 May 2017

Undo row selection of af:table in selection listener method conditionally


Recently I have seen a question on OTN Jdeveloper forum and It was about table selection listener
Requirement is like this suppose user has to check a condition after selecting a row and if that condition is true only then new row will be selected else selected row should be previous one

It means undo row selection on validation(condition) failure
So In this post I am implementing same scenario and here I am using Departments table of HR Schema to prepare model and condition is that user should be able to select new row only if ManagerId is not null

Saturday 1 April 2017

OTN Question: Not able to see last record in af:table when using icons (May be a bug)


Hello All

This post is about a problem that occurs sometimes in af:table when we use icon in any column, I am not sure that it is a bug or not but sometimes table is not fully stretched on first load and last row doesn't appear properly on page but after refreshing page again problem is solved.

Saturday 6 August 2016

ADF UI- Show DVT Chart inside af:table and other collection components


Hello All

This post is about showing a chart inside  ADF Faces Collection component like af:table or af:listView

This is a simple task to create normal chart but in case if we have to show table row record as a chart or graph then we have to change chart value and chart item value references so that it doesn't show all record but only values of that row

This post talks about these two requirements

1. Show same viewObject values as chart in af:table or af:listView
2. Show child viewObject values as chart in af:table or af:listView

Thursday 14 April 2016

ADF Skinning: Change Style of ADF Table, Column, Header, Data Cell and pagination bar


After a long vacation I'm back to work :)
This post is about changing look n feel of ADF Faces af:table component

I have seen many questions related to changing table column header style , selected row style, changing row banding styles etc

Tuesday 15 December 2015

Checkbox ValueChangeListener problem in af:table - ADF 12.1.3


Recently i faced a problem while working on one of my application, it has an editable table having one check box column and a valueChangeListener is defined on that check box.

Problem is that whenever user selects any row of table , valueChangeListener of check box is called every time for all editable rows, this is weird because VCL should execute only when user selects or deselects check box

Wednesday 7 October 2015

ADF Basics: Reorder ADF table column using DisplayIndex property

This post is about a very simple use case that is reordering of af:table column at run time. 
Ordering of columns in af:table is controlled by DisplayIndex property of af:column
Check what docs says-

Default Value: -1

The display order index of the column. Columns can be re-arranged and they are displayed in the table based on the displayIndex. Columns are sorted based on the displayIndex property, columns without displayIndex are displayed at the end, in the order in which they appear. The displayIndex attribute is honored only for top level columns, since it is not possible to rearrange a child column outside of the parent column.
Not supported on the following renderkits: org.apache.myfaces.trinidad.core

We can set DisplayIndex property for all columns in a sequence (1,2,3 etc) that we want to see on page

Monday 17 August 2015

Showing HashMap values in af:table using af:iterator

Previously i have posted about populating af:table programmatically using List Data Structure
Populate af:table programmatically from managead bean using POJO

This post covers same topic but this time requirement is different , we have a HashMap in managed bean and requirement is to show it's values on page in a table view
See Managed Bean code-


    //HashMap and it's accessors
    private HashMap<String, String> valMap = new HashMap<String, String>();

    public void setValMap(HashMap valMap) {
        this.valMap = valMap;
    }

    public HashMap getValMap() {
        return valMap;
    }
    // Object array to store key values of HashMap
    public Object[] getKeySet() {
        return getValMap().keySet().toArray();
    }


Added two inputText on page and a button to add new key and value to HashMap,


<af:panelFormLayout id="pfl1">
                    <af:inputText label="Key" id="it1" contentStyle="width:100px;"
                                  binding="#{viewScope.ShowHashMapAsTable.keyTextBind}"/>
                    <af:inputText label="Value" id="it2" contentStyle="width:100px;"
                                  binding="#{viewScope.ShowHashMapAsTable.valueTextBind}"/>
                    <af:button text="Add" id="b1" actionListener="#{viewScope.ShowHashMapAsTable.addValuesToMap}"/>
                </af:panelFormLayout>


Now code on button that get value of both inputText using component binding and add it to HashMap, at run time this form will be used to add new values to HashMap and table


    //Component Binding of inputText to get values
    private RichInputText keyTextBind;
    private RichInputText valueTextBind;

    public void setKeyTextBind(RichInputText keyTextBind) {
        this.keyTextBind = keyTextBind;
    }

    public RichInputText getKeyTextBind() {
        return keyTextBind;
    }

    public void setValueTextBind(RichInputText valueTextBind) {
        this.valueTextBind = valueTextBind;
    }

    public RichInputText getValueTextBind() {
        return valueTextBind;
    }

    /**Add new value to HashMap
     * @param actionEvent
     */
    public void addValuesToMap(ActionEvent actionEvent) {
        if (keyTextBind.getValue() != null && valueTextBind.getValue() != null) {
            valMap.put(keyTextBind.getValue().toString(), valueTextBind.getValue().toString());

        }
    }


Now Bean Part is done , see how to configure af:table to show HashMap values, table is mapped to array of keySet and an iterator is used inside table that derives value using key attribute -
#{cVal[row]}


<af:table var="row" rowBandingInterval="0" id="t1" value="#{viewScope.ShowHashMapAsTable.keySet}"
                              partialTriggers="::b1">
                        <af:iterator id="i1" value="#{viewScope.ShowHashMapAsTable.valMap}" var="cVal">
                            <af:column sortable="false" headerText="Key" id="c2">
                                <af:outputText value="#{row}" id="ot4" inlineStyle="font-weight:bold;color:darkblue;"/>
                            </af:column>
                            <af:column sortable="false" headerText="Value" id="c1">
                                <af:outputText value="#{cVal[row]}" id="ot3"/>
                            </af:column>
                        </af:iterator>
                    </af:table>


Now all done , run and check the application
 Add New Value (1)
  Add New Value (2)

Sample Application- Download (Jdev 12.1.3)
Cheers :) Happy Learning

Friday 17 July 2015

Apply sorting to POJO based af:table programmatically , Using custom sort listener in ADF

Again a post about POJO based table , previously i have posted about-

1.Populating and adding records in POJO based table
Populate af:table programmatically from managead bean using POJO
2. Gettting selected rows from POJO based table
Get selected row (single/multiple) from POJO based table in ADF

This post is about applying sorting to POJO based table , when we drop a viewObject as af:table on page then framework provides sorting and filtering features declaratively, but when populating table from managed bean using List(POJO) then it is not there so we have to do it manually

To understand this post completely , go through previous posts and check attached application there
I have used a PersonBean java bean class to contain columns of table or you can say there is a List of PersonBean type that populates data in af:table. (This is the basic information about application)


Now what to do , see step by step implementation-
  • Select table on page editor and create a sortListener in managed bean to handle sortEvent


  • Now what we have do in sort listener ?
    1.Get active sort criteria using sortEvent
    2.Remove that sort criteria
    3.Sort List Data Structure that is used to populate af:table
    4.Apply sort criteria again on af:table

    See code written in managed bean-

  •     //List to store sort criteria
        private List<SortCriterion> sortedTableList = new ArrayList<SortCriterion>();
    
        public void setSortedTableList(List<SortCriterion> sortedTableList) {
            this.sortedTableList = sortedTableList;
        }
    
        public List<SortCriterion> getSortedTableList() {
            return sortedTableList;
        }
    
        /**Custom Sort Listener for POJO based af:table
         * @param sortEvent
         */
        public void tableSortListener(SortEvent sortEvent) {
            //Get active sortCriteria on table
            List<SortCriterion> activeSortCriteria = sortEvent.getSortCriteria();
            SortCriterion sc = activeSortCriteria.get(0);
            // Remove active criteria from table
            this.removeSortCriteria(sc);
            //Sort List that populates table using Comparator interface
            applySortAsPerColumn(sc.getProperty());
    
            // Add the current criteria to the list
            this.sortedTableList.add(0, sc);
            // Apply sort criteria to table
            RichTable richTable = (RichTable) sortEvent.getComponent();
            richTable.setSortCriteria(sortedTableList);
    
        }
    
        /**Removes sort criteria*/
        private boolean removeSortCriteria(SortCriterion sortCriterion) {
            //Checks that if any sortCirteria is present in list , if yes then remove it
            if (sortedTableList != null && sortedTableList.size() > 0) {
                for (SortCriterion sc : sortedTableList) {
                    if (sc.getProperty().equals(sc.getProperty())) {
                        sortedTableList.remove(sc);
                        return true;
                    }
                }
            }
            return false;
        }
    

    Now logic to apply programmatic sort starts from here , we have to sort List using Java Comparator interface
    To Read more - How to sort ArrayList using Comparator?     Comparator interface

        private void applySortAsPerColumn(String criteria) {
            //Get List that populates table
            List<PersonBean> list = getPersonList();
            //Check which column's sorting is triggered from UI
            //and then sort list on basis of that attribute
            //Sorting of collection makes use of Comparator interface, Read about it
            if ("name".equalsIgnoreCase(criteria)) {
                Collections.sort(list, new ProgTableBean.PersName());
            } else if ("mobNo".equalsIgnoreCase(criteria)) {
                Collections.sort(list, new ProgTableBean.MobNo());
            } else if ("salary".equalsIgnoreCase(criteria)) {
                Collections.sort(list, new ProgTableBean.Salary());
            }
        }
        // Comparator for all attributes to sort List according to different attributes
    
        public static class PersName implements Comparator<PersonBean> {
            private int flag = 1;
    
            @Override
            public int compare(PersonBean o1, PersonBean o2) {
                return flag * o1.getName().compareTo(o2.getName());
            }
        }
    
    
        public static class MobNo implements Comparator<PersonBean> {
            private int flag = 1;
    
            @Override
            public int compare(PersonBean o1, PersonBean o2) {
                System.out.println("In 2**");
                return flag * o1.getMobNo().compareTo(o2.getMobNo());
    
            }
        }
    
    
        public static class Salary implements Comparator<PersonBean> {
            private int flag = 1;
    
            @Override
            public int compare(PersonBean o1, PersonBean o2) {
                return flag * o1.getSalary().compareTo(o2.getSalary());
            }
        }


  • Now on page ,select table and set sortable true for each column and set sortProperty same as column name
    Check af:table source after setting all properties

  • <af:table var="row" rowBandingInterval="1" id="t1" value="#{viewScope.ProgTableBean.personList}"
                              partialTriggers="::b1" rowSelection="multiple" binding="#{viewScope.ProgTableBean.tableBind}"
                              selectionListener="#{viewScope.ProgTableBean.tableSelection}"
                              sortListener="#{viewScope.ProgTableBean.tableSortListener}">
                        <af:column sortable="true" headerText="Name" id="c1" width="150" sortProperty="name">
                            <af:outputText value="#{row.name}" id="ot1"/>
                        </af:column>
                        <af:column sortable="true" headerText="Mobile Number" id="c2" sortProperty="mobNo">
                            <af:outputText value="#{row.mobNo}" id="ot2"/>
                        </af:column>
                        <af:column sortable="true" headerText="Salary" id="c3" align="right" sortProperty="salary">
                            <af:outputText value="#{row.salary}" id="ot3"/>
                        </af:column>
                    </af:table>
    

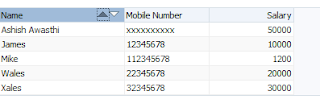
  • All done :) , Run and check application


Sample ADF Application -Download
Cheers :) Happy Learning

Thursday 16 July 2015

Get selected row (single/multiple) from POJO based table in ADF


Previously i have posted about populating af:table from managed bean using POJO and adding records in it, Check this-
Populate af:table programmatically from managead bean using POJO 
In this post i am extending previous post application
This post is about getting selected row from POJO based table , It is a common requirement while using af:table based on POJO

Get single row using custom selection listener-


SelectionListener  handles selection event of table , whenever user selects a row in table ,selection listener is fired
Set table RowSelection property to single (to select one row at a time) or multiple (to select multiple row ) and create a custom selection listener in managed bean that will handle table's selection event


See selection listener code in managed bean we can get selected row  using this -


import oracle.adf.view.rich.component.rich.data.RichTable;
import org.apache.myfaces.trinidad.event.SelectionEvent;

 /**Method to get selected row(single)
     * @param selectionEvent
     */
    public void tableSelection(SelectionEvent selectionEvent) {
        //Get table from selectionEvent
        RichTable richTable = (RichTable) selectionEvent.getSource();
        //Cast to the List that populates table
        PersonBean row = (PersonBean) richTable.getSelectedRowData();
        //Get the attributes (column) from list
        System.out.println(row.getName());
    }

Now check this -

 Output on console :)

Get single/multiple selected row on a button click (ActionEvent)-


Set table RowSelection to multiple and select multiple row using Ctrl key of your keyboard
and check this code to get multiple selected row using RowKeySet, We can get all row using getSelectedRowKeys method


import org.apache.myfaces.trinidad.model.RowKeySet;
import java.util.Iterator;    


/**Method to get all selected record in af:table
     * @param actionEvent
     */
    public void getSelectedRecord(ActionEvent actionEvent) {
        //getTableBind is binding of table on page.
        RowKeySet selectedEmps = getTableBind().getSelectedRowKeys();
        //Create iterator from RowKeySet
        Iterator selectedEmpIter = selectedEmps.iterator();

        while (selectedEmpIter.hasNext()) {
            String i = selectedEmpIter.next().toString();
            //personList is the list used to populate table and name is a column of table
            //So here filter list using index and get values then
            PersonBean rowIter = personList.get(Integer.parseInt(i));
            System.out.println(rowIter.getName());
        }
       
    }

Now run and check again -

 Output on console :)

Sample ADF Application- Download
Cheers :) Happy Learning

Saturday 27 June 2015

ADF Basics: Using contentStyle and inlineStyle property to change basic styling of component in ADF Faces

Hello All,
Again a post about ADF Basics for beginners
I have seen lots of thread on OTN about changing basic styles of component . for example,

How to change font size of inputText ?
How to change color of inputText/outputText ?
How to change color of link or button ?

and everyone starts creating a css/skin for these minor changes but there is no need of that
Skin should be used for complex styles or you have apply same style to all components of your application

If you will read API docs then you will know this, See what docs says about inlineStyle property-

The CSS styles to use for this component. This is intended for basic style changes; you should use the skinning mechanism if you require any complex style changes. The inlineStyle is a set of CSS styles that are applied to the root DOM element of the component. Be aware that because of browser CSS precedence rules, CSS rendered on a DOM element takes precedence over external stylesheets like the skin file. Therefore skins will not be able to override what you set on this attribute.


Difference between contentStyle and inlineStyle -


contentStyle property used to style content part of component like if you want to change color of inputText or any other input component then you have to specify this in contentStyle property of that component

inlineStyle is about whole component and also available in output (outputText) or collection (table, tree etc) component's property where contentStyle is not there. This can be use to set width, height ,border or color of output components etc.

So this is enough about theory , no one likes theory ;) , Everyone is looking for some code that is ready to use
Let's see some practical usage of both properties -

Change font, color, size(width), padding of input components (af:inputText, af:inputDate, af:selectOneChoice etc)-


Used this in contentStyle property of components
width:150px;color:white;font-weight:bold;font-size:small;background-color:red;padding:5px;
and check the output


you can also change input text to uppercase , lowercase, Initcap using contentStyle property, just use any of this -
text-transform:uppercase; // To change in uppercase
text-transform:lowercase; //To change in lowercase
text-transform:capitalize; //To change in initcap

Change properties of output components , color of link/button -

Output components doesn't have contentStyle property as there is not content part in component , here we make use of inlineStyle property
See what happens on applying same style in outputText and link using inlineStyle


It looks good :) , but same style doesn't work for button because button has multiple root element (we can only change width, color of text and font of button but background color and other styling can not be changed using inlineStyle property)
For more detail about button skinning check - Customize af:button (font, shape, size, color etc) using skinning -Oracle ADF (12.1.3)

Change data collection components (af:table, af:treeTable,etc) height, width -


just write in inlineStyle property like this
width:600px;height:200px;background-color:lightyellow;color:red;
background color will be applied on empty area of table and color will be applicable on column header and EmptyText
Remember to set table's height using inlineStyle ensure that autoHeightRows should be set to -1


In same way we can change color of columns too, see i have used different background colors (set background-color:colorName; in inlineStyle of af:column) for columns and it looks like this


Now it's your turn , try more combination on different components. you can do a lot using contentStyle and inlineStyle property. Remember all these changes can be done using skin also but if have some minor changes then why use skin , when framework provides these wonderful properties

Cheers :) Happy Learning

Monday 24 November 2014

Populate af:table programmatically from managead bean using POJO

This post is about a common question
How can we populate an af:table programmatically ?

It means that data in af:table is not populated through model layer (Using ViewObject) using binding layer. lets say I have some values in our managed bean and have to show records in tabular format on page

So what we have to do -
  • First you should know the number and data type of columns in table, suppose i have to populate a table for person details (name, mobile number and salary). to get and set value of columns i have created a java bean class , it has 3 variable for 3 columns


  • // Java Class to set and get value for table column
    public class PersonBean {
    
        public PersonBean(String name, String moNo, Integer salary) {
            this.Name = name;
            this.mobNo = moNo;
            this.salary = salary;
        }
        private String Name;
        private String mobNo;
        private Integer salary;
    
        public void setName(String Name) {
            this.Name = Name;
        }
    
        public String getName() {
            return Name;
        }
    
        public void setMobNo(String mobNo) {
            this.mobNo = mobNo;
        }
    
        public String getMobNo() {
            return mobNo;
        }
    
        public void setSalary(Integer salary) {
            this.salary = salary;
        }
    
        public Integer getSalary() {
            return salary;
        }
    }
    

  • Next step is to create a managed bean for referencing af:table , this managed bean makes use of person java bean class to add data in same format for all table rows. A List data structure is used to pass all values in af:table. See code of managed bean 

  • //ArrayList to poplate data in af:table
        List<PersonBean> personList = new ArrayList();
    
        //To Populate default row in table (Code in Constructor)
    
        public ProgTableBean() {
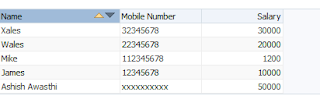
            personList.add(new PersonBean("Ashish Awasthi", "xxxxxxxxxx", 50000));
        }
    
        public void setPersonList(List<PersonBean> personList) {
            this.personList = personList;
        }
    
        public List<PersonBean> getPersonList() {
            return personList;
        }
    

  • Now just drop an af:table on page and set it's properties like value, column header and text values in columns

  •  As i have to show only 3 columns so deleted extra ones

     Set properties -
     value- from where table collection is populated
     columns values- take the var reference of table and refer variable name in List (here 'row' is table var and second is variable name in person bean class)


     See the XML source of af:table-

    <af:table var="row" rowBandingInterval="1" id="t1" value="#{viewScope.ProgTableBean.personList}"
                              partialTriggers="::b1">
                        <af:column sortable="false" headerText="Name" id="c1" width="150">
                            <af:outputText value="#{row.name}" id="ot1"/>
                        </af:column>
                        <af:column sortable="false" headerText="Mobile Number" id="c2">
                            <af:outputText value="#{row.mobNo}" id="ot2"/>
                        </af:column>
                        <af:column sortable="false" headerText="Salary" id="c3" align="right">
                            <af:outputText value="#{row.salary}" id="ot3"/>
                        </af:column>
                    </af:table>
    

  • Now run this application and see there will be one row in table as code is added in constructor of managed to populate one row


  • I have added a form and button in page to add new records in table , see the form source code

  • <af:panelFormLayout id="pfl1">
                        <f:facet name="footer"/>
                        <af:inputText label="Name :" id="it1" binding="#{viewScope.ProgTableBean.nameBind}"/>
                        <af:inputText label="Mobile Number :" id="it2" binding="#{viewScope.ProgTableBean.mobNumBind}"/>
                        <af:inputText label="Salary :" id="it3" binding="#{viewScope.ProgTableBean.salaryBind}">
                            <af:convertNumber/>
                        </af:inputText>
                        <af:button text="Add Record" id="b1" actionListener="#{viewScope.ProgTableBean.addNewRcord}"/>
                    </af:panelFormLayout> 
     

    Code in managed bean for button action-

        /**Method to add new record in table
         * @param actionEvent
         */
        public void addNewRcord(ActionEvent actionEvent) {
            //Get all values using compoenet binding as mobNumBind
            if (mobNumBind.getValue() != null && nameBind.getValue() != null &&
                salaryBind.getValue() !=
                null) {
                // Add new Record in List
                personList.add(new PersonBean(nameBind.getValue().toString(), mobNumBind.getValue().toString(),
                                              Integer.parseInt(salaryBind.getValue().toString())));
            }
        }
    

  • now run and check application- 


 More posts on POJO Based table -

Get selected row (single/multiple) from POJO based table in ADF
Apply sorting to POJO based af:table programmatically , Using custom sort listener in ADF

Thanks , Happy Learning :)
Download-Sample ADF Application

Wednesday 19 November 2014

Populate Dynamic table and form using af:dynamicComponent and dynamic viewObject - Oracle ADF

This post is about a common development requirement- Can we increase or decrease number of fields , type of fields (columns in case of table), data in fields at run time?

Suppose i have to show data of Departments and Employees table on page using only one af:table component. It means columns should be generated dynamically at run time depending on any defined condition
So for this requirement i am using dynamic viewObject in model layer and af:dynamicComponent in view layer
See previous post about creating dynamic viewObject-
Creating Dynamic View Object at Runtime programmatically - Oracle ADF

See step by step implementation-
  • Create Fusion Web Application and follow the link posted above to create dynamic viewObject, in short create a viewObject using dual and a method in AMImpl to create dynamic viewObject from sql query


  •     /**Method to create viewObject using SQL query
         * @param query


         */
        public void createNewViewObject(String query) {
            ViewObject dynVo = this.getdynamic1();
            dynVo.remove();
            this.createViewObjectFromQueryStmt("dynamic1", query);
            this.getdynamic1().executeQuery();
        }
    

  • Created a page and added an inputText to enter SQL query and a button to process that query and create dynamic viewObject at run time


  • See Managed Bean code to process query, value of inputText is passed using component binding

  •     private RichInputText sqlQueryBind;
    
        public DynamicTableBean() {
        }
    
        /*****Generic Method to call operation binding**/
        public BindingContainer getBindingsCont() {
            return BindingContext.getCurrent().getCurrentBindingsEntry();
        }
    
        /**
         * Generic Method to execute operation Binding
         * */
        public OperationBinding executeOperation(String operation) {
            OperationBinding createParam = getBindingsCont().getOperationBinding(operation);
            return createParam;
    
        }
    
        /**Method to create viewObject
         * @param actionEvent
         */
        public void createViewObjectAction(ActionEvent actionEvent) {
            if (sqlQueryBind.getValue() != null) {
                OperationBinding ob = executeOperation("createNewViewObject");
                ob.getParamsMap().put("query", sqlQueryBind.getValue().toString());
                ob.execute();
            }
        }
    
        public void setSqlQueryBind(RichInputText sqlQueryBind) {
            this.sqlQueryBind = sqlQueryBind;
        }
    
        public RichInputText getSqlQueryBind() {
            return sqlQueryBind;
        }
    

  • Now dropped this dual viewObject on page as dynamic form and dynamic table from Data Control (this snap is about creating form)


  • Next is to change pageDef entry for this dynamic component , open pageDef and goto treeBinding. there is an entry for nodeDefinition, there will be separate treeBinding for form and table both (you should change both)

  •  <tree IterBinding="dynamic1Iterator" id="dynamic1">
                <nodeDefinition DefName="dynamictableapp.model.view.dynamicVO" Name="dynamic10"/>
            </tree>
    

    Change this entry like this-

     <tree IterBinding="dynamic1Iterator" id="dynamic1">
                <nodeDefinition Name="dynamic10"/>
            </tree>
    

  • Now run this application and enter SQL query in box and press process button


 Thanks, Happy Learning :)
Download -Sample ADF Application